How to: make your own advent calendar
How to: make your own advent calendar
Advent calendars are special things. They’re that subtle something that means you can start to celebrate the fact that Christmas is coming without needing to put the rest of the decorations up if you don’t want to just yet.
Whether you have little people under your roof or not, advent calendars are something that can be enjoyed at any age, because having a snowman-shaped chocolate every day, or opening the advent window to see a sweet, festive picture, is something that will make any December day that bit happier.
Sometimes we buy ours from the shops, but sometimes we make our own. It’s an activity that’s as fun as decorating the tree. It’s an opportunity to get crafty that artistic sorts and those less-so can get involved in. It’s something that, once made, can be brought out year after year, refilling the little windows with new ideas and thoughtful treats. It’s a way to make the advent calendar even more special still.
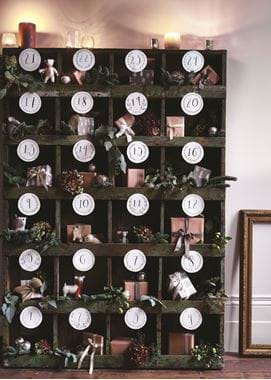
1 The first thing to do is to find a frame that you can fill. There’s all sorts that you can use to do this and it all depends on how big you’d like your advent calendar to be, how much you’re happy to spend, and whether you want it to last for many Christmases to come. To create one like ours, visit a local vintage shop or reclamation yard and see what you can find. An old wooden fruit crate works well, and if you can’t find one with the right number of spaces, just get some inexpensive timber boards from a DIY store to create sections – it requires a bit of hands-on work, but nothing too complicated. Searching for a pigeon hole storage unit is another option. Or, you can make a smaller frame using cut-up cardboard (the thicker sort rather than cereal boxes so it can take a bit of weight), lots of glue and then lots of paint to decorate the outside.
2 Next, decide what you want to fill each of the 24 windows with. This is the only part that we suggest children aren’t allowed to peek at, otherwise, it’s an activity that everyone can be involved in at every step.
We like to do a mixture of sweet treats, tiny keepsakes, and one or two gifts that don't take themselves too seriously. Promise-me vouchers are another idea that you can fill at least one or two slots with. For grown-ups, that might be ‘I promise to do the washing up tonight’, or for little ones, it could be ‘I promise to take you for hot chocolate with marshmallows this weekend’. For children, we also love to write the odd riddle or two on a few of the days – it could be a festive anagram or, on Christmas Eve, it might be a series of clues that leads them to an early Christmas present.
You can set a budget, because it’s very tempting to overspend on this sort of thing, or consider alternating who opens it each day. Wrapping paper at the ready, wrap up each of your advent gifts to make them look all the more appealing and exciting to open. We used a mixture of gift wrap, some with ribbons and some not, to make sure the overall look is rich and varied.
3 To make your advent calendar all the more charming, we love to decorate it. A blend of real bits of fir and fallen twigs along with stems from our Flower Shop (cut down to size so they fit in each box) is a good place to start, then add a few cloves and cinnamon sticks so it smells suitably festive each day you walk by. Baubles and little character decorations peeping out of each box are always an irresistible touch too. These are the things that make your advent calendar a real feature in your Christmas scheme rather than something that just sits quietly on a shelf. And, if you’ve gone down the vintage wooden crate route, it spruces it up so that you needn’t do anything to the rest of the frame other than to dot a few tealight holders or a strand of fairy lights along the top edge.
4 The final thing to do is to write out the numbers 1–24 to pin onto each cubbyhole and then find your chosen spot to let it stand proud.
Happy crafting!


